Built In Wardrobe with Storage
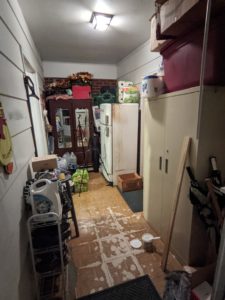
My mom and I took on the largest DIY project either of us had ever done by deciding to completely renovate her back porch/laundry room from top to bottom. I have several other posts about what all we did if you missed those (LVP install, built in bench, shelving unit, and laundry folding table), but this is the final one! My parents both work outside the home and have uniforms for their jobs. Their work clothes have almost always lived on the back porch in old wardrobes that we sold when we started the porch renovation. They were old and we knew they weren’t going to fit into the new aesthetic that we were envisioning for the space. However, because we got rid of that storage, we knew we’d need to build a new space to store the clothes once we got to the built in phase of the porch reno. Here’s a before of the corner where we built the wardrobe. The area with the super old refrigerator and the brick wall is where we built it.
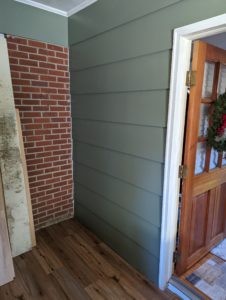
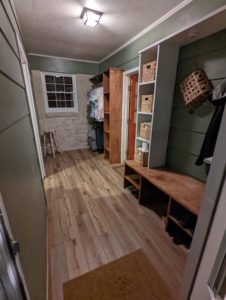
After all the other builds we did, there was really only one corner left for the wardrobe and I think it actually worked out perfectly. Here is the same corner after we painted and redid the floor. We also limewashed the brick wall, but that’ll be in a separate post.
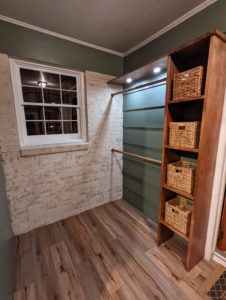
We had also built so many other things up to this point that this build was pretty easy and went relatively quickly since we had a better idea of what we were doing. I think we knocked out the actual build in a couple of days and the finishing work/staining took another couple of days. The build was pretty basic: 2 clothes rods – one on top of the other, and then 4 cubbies on the right side for additional storage with a board on the top to give it a more complete look and to give a little more storage.
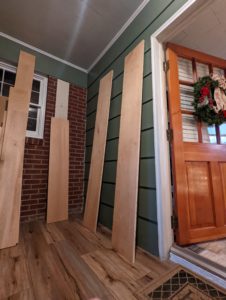
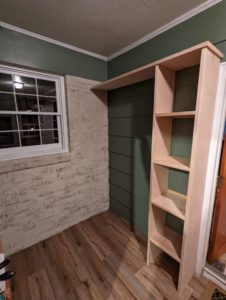
We started by cutting the two vertical support pieces for the sides of the cubbies out of 3/4″ maple plywood. (The vertical supports are the two tall boards leaning against the wall in the photo below.)
Once those were cut to size, we routed out dados for the shelves to sit in. I like doing this method for shelves because it looks more professional/built in in my opinion and doesn’t require support pieces under the shelves to hold them up. The shelves fit in the grooves and then you can just add wood glue and it’s a snug, secure fit.
I then cut 4 shelves to the same size because we decided to try a different method of installation this go around.
In previous builds, we installed the support pieces first and then measured for the shelves. Because walls are wonky and we’re not perfect, the shelf measurements always ended up being slightly off from one another. This time we chose to install the support piece on the right first by screwing it into studs with pocket screws, then put the shelves into place, put the left support piece into place and then install it.
After the left board was installed, we removed the shelves, added wood glue, and then put them back into place for good. It actually worked surprisingly well. We did add a few brad nails into the sides of the support pieces into the shelves because the vertical boards were scraps we had leftover from other builds and they were slightly warped. The nails helped straighten them out a bit. I think the shelves ended up being slightly unlevel because the floor was a bit unlevel still despite our best efforts to level it, but it’s not super noticeable and it’s not going to impact anything that my mom would want to store on the shelves.
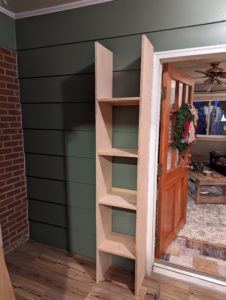
Once the shelves were installed, all that was left for actually building was adding a top shelf so it didn’t look unfinished. We cut that board to size out of 3/4″ maple plywood too and again screwed into studs using pocket screws.
I don’t like the raw edge of plywood, but instead of using edge banding, I like to add a bit more dimension with a thicker board. I bought a 3ft long poplar board for the trim that was about 6″ wide. I ripped it down into around 1″ pieces so that it would cover the plywood but also give me a bit of an overhang.
Obviously poplar and maple are different woods, but poplar doesn’t have an aggressive, obvious grain like pine does. It’s also not insanely expensive and it stained similarly to the maple so it’s hard to tell that they’re different. Of course this is personal preference though and you’re free to use whatever wood you want! I cut the trim to size and attached using my nail gun.
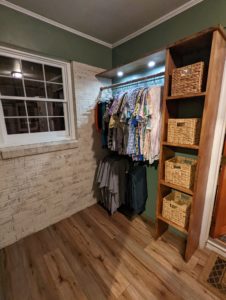
After the trim was attached, all that was left was the finishing work: wood filling nail holes/seams, caulking where the wood met the wall, sanding, and staining. I stained the whole thing to match the other built ins on the porch in Minwax Early American. The last step was to figure out where to place the clothes rods so the clothes hangers wouldn’t hit the back wall and the clothes could hang freely.
I actually messed this up originally on the top rod as I didn’t think about leaving enough room for the hanger to move freely. I had to remove the rod and move it out a bit to allow for the hanger to clear. After the rods were attached I was finally all done with the wardrobe!
Compared to some of the other builds in this space, this one was really quite simple and didn’t take a ton of time. It also meets a really practical need for my parents as their work clothes now have a perfect place to hang that’s out of the way but also easily accessible. Let me know what you think in the comments and if this inspired you to build something similar in your own home. I’m also happy to answer any questions you might have!
One Comment
Pingback: