Built In Shelving
In February 2021, my mom and I decided to completely renovate her back porch. It was a huge undertaking and is therefore a multipart series. This is part 3 of 5. ? You can find part one about how we leveled the floor here and part two about how we built a bench with shoe storage here. Once I built the bench, I felt more confident to tackle the largest project in the space which was a massive shelving unit. My mom wanted to use it as a pantry since her kitchen doesn’t have one, along with extra storage for tools, paint, cat food, and other miscellaneous home items that didn’t have a place elsewhere.
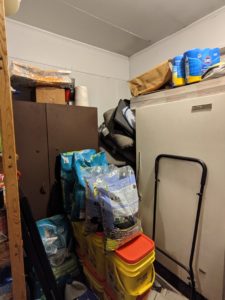
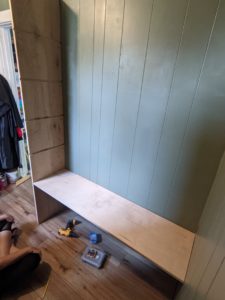
There is a back corner of the porch that honestly housed a lot of junk before, but was a perfect spot to build the shelving. Here is what that corner of the porch looked like before we did anything to it at all.
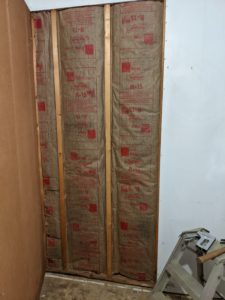
Once we cleared all the stuff out and before we installed the new flooring, we decided to check behind the panels to see if there was any insulation. We suspected there wasn’t because the porch is always really cold in the winter and really hot in the summer. Sure enough, there was none, so we added that too. Like I said: huge undertaking.
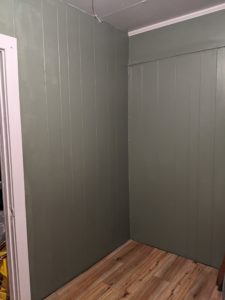
Finally, we were able to spackle holes, caulk the seams between the paneling, and paint to match the rest of the porch.
After all that, it was finally time to get to building. My mom knew she wanted an L shaped unit that would fit perfectly in the corner and give her the most storage space possible. Here’s my great rendering of what it will look like. ? I had posted this to my Instagram stories, hence the text.
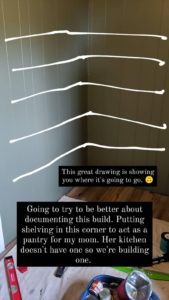
Thankfully, I’m a much better builder than I am artist.
Anyway, we decided that 6 shelves would be a good amount for the space, but to figure out the spacing, we actually started with the bottom one. My mom has a few pet carriers and bags of food that she wanted to be able to store on the floor underneath the unit so we measured how tall those were to set the height of the bottom shelf. From there, we figured out what would be a good height for the rest of the shelves and then determined a distance that would make them all relatively equal. To hopefully make the process easier later on, I decided it would be helpful to have level lines drawn around the room to line the shelves up with once we got to the point of installation. We didn’t have a laser level at the time, so I used a 4ft level and drew lines all the way around. (My mom bought a laser level after the fact because we never wanted to have to draw level lines that way ever again. haha. It’s already been helpful in projects I’ve done since).
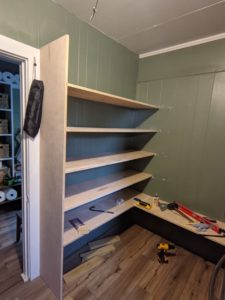
Once that was done, I finally started to actually build. When you’re looking at where the unit would go, the left side was going to butt up to a doorway. We wanted the shelves to look more like a piece of furniture rather than just floating shelves so we decided to add an end vertical support piece on the left hand side. I cut this to the appropriate height using 3/4″ maple plywood and then routed dados into it for the shelves to sit in. Since the shelves are pretty long and about 16″ deep, I wanted them to have extra support too besides just the studs. After the dados were cut, I also drilled holes for pocket screws and then used the screws to attach the board to the stud.
I used longer screws here than you typically would for 3/4″ plywood because I was attaching to studs and I wanted it to be extra secure. We also made sure that the board was a square as possible since all the other boards would be coming off of this one. If it was wonky, then that would throw the whole thing off.
I know it probably seems like not a whole lot has happened up until this point, but if I’ve learned anything from doing DIY projects it’s that prep is key. Taking the time to ensure things are level and square and planning it all out, even if it is a poorly drawn sketch in Instagram, makes such a difference in the final product. Anyway, next up was cutting the shelves to fit. While I was trying really hard to ensure everything was square/plumb/level, the people who built this porch addition weren’t so careful. Therefore, of course the shelves weren’t all the same length because why would they be? ? We measured for each one and then cut to fit.
‘
Usually I cut a little long so then we’d have to shave some off to get it to fit perfectly (or at least as good as we were going to get it). Lots of trial and error and frustration if I’m being honest, but it came together eventually.
We originally started with the bottom shelf first, but then decided it might be easier to work top down. Cutting the shelves that completed the L and went to the right side corner was pretty challenging too. We figured it would be easier to have the board be a little long, rest it on top of the shelves that were already in place on the left and then scribe where they met underneath. That worked better, but we still ended up with some gaps that needed to be filled, primarily because as I mentioned earlier, the walls aren’t square. Not perfect by any means, but it works for our purposes and still looks nice.
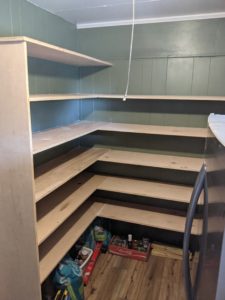
Once all the shelves were installed, we added a board on the top to cap off the vertical support piece and to give it a more finished look.
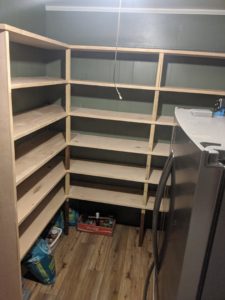
After that, it was just all the finishing work to make it look more complete. I ripped down some 3/8″ thick boards into about 1″ strips to cover the raw plywood edge. We did the same thing with the bench and it turned out nice while adding some dimension to the build that you don’t get with just edge banding.
At this point, we were a little bit concerned with the stability of the shelves, particularly on the front edge. While the shelves weren’t super deep (around 16″) and they were screwed into studs, they felt a tad bit wobbly on the front and we didn’t love that. I wanted the unit to be as structurally sound as possible since it is so massive and I knew it was going to be holding some pretty heavy things. I ultimately decided to rip down some 2x4s into 2x2s and used those to support the front edge of the shelves. I started with the bottom, used wood glue, and then screwed them in from the top so that you wouldn’t see how they were connected. I honestly feel bad for whoever buys this house once my parents decide to sell if they want to remove these shelves. ? It would be quite an ordeal.
After I was happy with how sturdy it was, I wood filled all the nail holes/seams and then we sanded the whole thing down, cleaned up all the dust, stained it, and added polyurethane to seal it. I also caulked the seams were the shelves met the wall and did paint touch ups as needed.
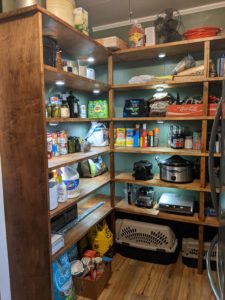
Lastly, we decided to add battery operated puck lights on the underneath side of the shelves to make it easier for my mom to find what she was looking for since the corner can get pretty dark. And plus they add a touch of coziness too. Then, it was finally done! While this sounded somewhat convoluted and pretty involved, it actually only took about a week from start to finish to build. Building the bench first definitely made this build go a lot smoother. It wasn’t without its hiccups, but I felt better equipped and more confident in my abilities to get it done. Here it is right after it was finished and then once we filled it up with all the things.

While I know this is probably a pretty unique build as most people likely don’t have this kind of space in their home, I hope this inspires you to make the most of what you do have and maybe build something similar or similar but on a smaller scale. Let me know what you think below! I’d love to hear your thoughts.