Installing Luxury Vinyl Planks
Back in February, I told my mom that I wanted to makeover her back porch. To be frank, it was a hot mess. My parents moved into their current house in the summer of 1990 and I don’t think they’ve ever touched their back porch. Calling it a porch might be confusing to some as it’s entirely enclosed with walls and doors. It’s more of mudroom/laundry room/storage room and also their most used entrance. I’ll include some pics of the before below so you can get an idea of what we were working with. The plan from the get-go was to make the space more functional. Before, it was ugly, cluttered, disorganized, and just not a good use of space. It’s actually quite large and has plenty of room for all the things she wants to use it for; it just wasn’t being utilized well.
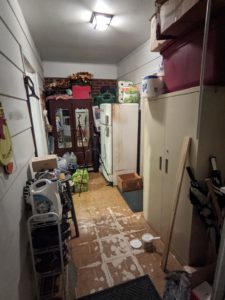

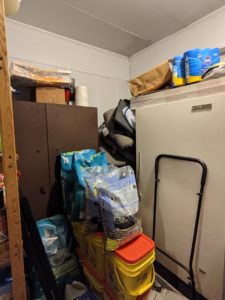
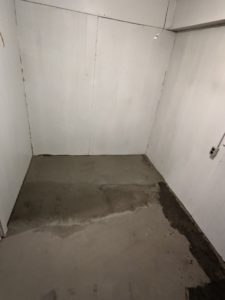
Before photos: like I said – cluttered, hot mess, disorganized, ugly
Anyway, first things first. We decided if we were going to give it a makeover, we were going to do it right – starting with the floor. We’ve always known the floor was unlevel because you could tell from the large wardrobes that were there before. They leaned towards the center of the room so it was clear the floor sloped to a low spot. We began by tearing up all the old flooring. It was harder than we anticipated because they were vinyl tiles that were glued down and we think the wear and tear of decades of people walking on them really made them stuck. I think it ended up taking us 3-4 days just to clean out all the junk and remove the old flooring. Here’s some of that process. It was tough work! (Heads up: the videos have music so mute your speakers if you’re somewhere you don’t want others to hear!)
Once all the old flooring was finally out, we poured new self-leveling concrete. This process ended up being harder than we anticipated (shocking right?! when is DIY ever straightforward? ?). We primed the old concrete floor and then mixed up and poured the new self-leveling concrete. You’d think by the name that it would, ya know, self-level, but that’s not really what happened. Ha. In the front half of the porch, the concrete mostly pooled to the center of the room and just gave us a pretty looking new floor that still wasn’t level. We ended up having to mix up more concrete and pour it more in the center of the room where the low spots were. It makes sense that we had to do it this way, but it took a bit of trial and error to figure it out.
This was the first go of pouring the self-leveling concrete. We went back the next day and redid the parts where it was still low. I don’t have footage of that though because it was essentially the same process as this, just focusing more on the low spots rather than the entire floor.
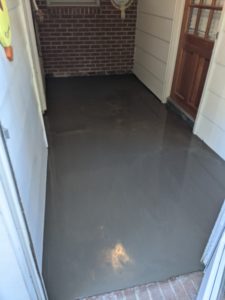
Here’s the new floor right after we finished pouring it.
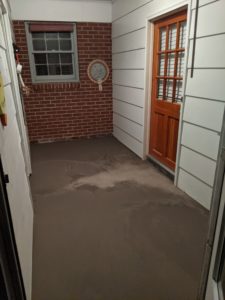
Here it is a few hours later when it was starting to cure. Eventually the whole floor turned that light gray/whitish color.
Here is the new concrete flooring on the back half of the porch. We had similar issues here with there being low spots and having to go back and add more concrete. We went a different route here though and decided to use a patch concrete rather than self-leveling. It wasn’t as pretty, but it did the job and dried a bit faster than the self-leveling did.
The process of pouring new concrete was pretty time consuming. It took several days as you have to allow the concrete to cure for a certain amount of time before you can start laying new flooring over top of it. We also were working in sections since there’s a front and back half of the porch and we were having to shuffle items around that needed to stay inside to be protected from the elements.
Once we finally finished pouring all the new concrete, it was time to start laying the floor. Another reason we had to level out the floor is because luxury vinyl planks (LVP) requires a mostly level surface to prevent buckling or shifting in the flooring over time. The condition of the concrete before we poured the self-leveling concrete was just too uneven. It would have made install incredibly difficult and would have given us a worse finish in the end. So, while the self-leveling process was complicated and drawn out, it was worth it for a nice finished product. (In case you were wondering why the floor underneath is concrete: this space was a carport at one point in time and obviously the floor was just concrete then. When it was converted into a porch/storage space, they just put the vinyl tiles straight on top of the concrete).
Here we are finally laying the new LVP! To be honest, this video makes the process look super easy and seamless, but that’s not entirely the case. Laying LVP is pretty straightforward, but the first couple of rows are always the hardest. I left that part out of the video because frankly, I was frustrated and it was slow going and I didn’t think it would be super exciting to watch. The first few rows are difficult because LVP is a floating floor meaning it’s not attached to anything other than itself. Therefore, it likes to shift when you’re trying to get it started. Once you get going though, it goes pretty quick and is relatively easy if you don’t have many tedious cuts.
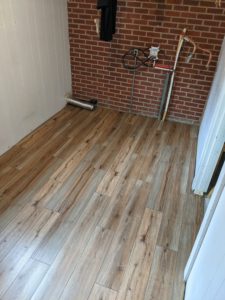
Here’s the finished product! This is the back half of the porch.

And this is the front half! I think it took me 2 days total to install both sections, maybe 3. There weren’t a ton of difficult cuts, but since I’m not a pro, it takes a decent amount of cutting and recutting to get pieces to fit how I want them to when having to go around walls, door frames, plumbing, etc. Overall, the process of installing this floor was more complicated than most projects would be since you typically wouldn’t have to level out your subfloor first. I wanted to share our experience though in case you ever do find yourself in a situation like this where you need to pour self-leveling concrete first. It’s time consuming and can be frustrating, but you can do it! As always, let me know if you have any questions. Happy to help in any way I can and offer what little I do know! Happy DIYing!
3 Comments
Pingback:
Pingback:
Pingback: