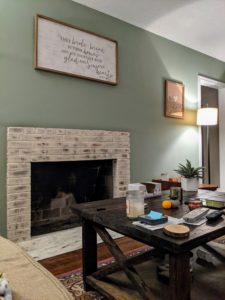
DIY Limewashed Fireplace
Painting or limewashing brick is a bit controversial, but sometimes I feel like it’s the best option given the circumstances. I’ve heard people say that painting brick will be the equivalent of putting carpet over hardwoods like our grandparents did in the 70s. Obviously since I’m writing this post, I think it’s fine if it’s done right. Maybe you’ll agree with me after reading through!
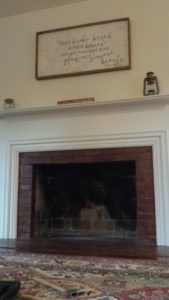
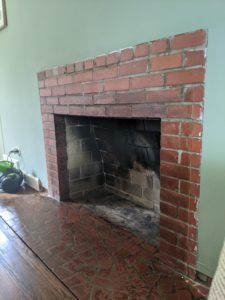
This all honestly began because the wall above the fireplace began to crack a few years after we moved in and I realized that the mantel was likely too large and not attached appropriately to the wall. The mantel had begun to pull off the wall causing the sheetrock to crack and bow outward. I consulted my cousin who is a general contractor and this was his thought as well. We even had someone come to inspect the chimney to see if there was any structural issue going on that may be causing the bowing and cracking, but he determined that the chimney was structurally sound. Ultimately, I felt comfortable removing the mantel and decided to repair the wall. That’s another post for another time though. Haha. Removing the mantel did also reveal a missing brick as well that you’ll see in the photos below. I had to replace that too before limewashing the brick. This is how every project goes for me. It snowballs into more than you bargained for. Anyone else?! ![]()
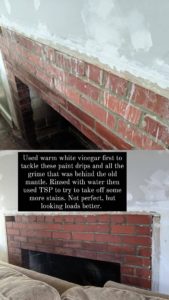
Back to the project at hand: our house was built in 1947 and has a lot of the original charm and character still intact which I’m so thankful for…one of those being what I’m assuming is the original wood burning fireplace. However, the brick was in rough shape. It was old and so stained/dirty. I tried and tried and tried to clean it and give it new life, but it felt like no matter what I did, it still didn’t look all that appealing in my opinion. It wasn’t a pretty rustic looking brick like you might expect for a house that’s 70+ years old. A lot of the stains did lift, but it still just wasn’t my style.
I started researching ways to paint or limewash the brick in hopes that I could give it new life, but also still allow the brick to shine through a bit. I came across Romabio Paints who have a limewash that does just that. If you use it on the exterior of a building, the limewash is supposed to naturally weather over time and give you an old world, aged look that will appear like it’s been there for decades. Of course the same doesn’t happen inside, but I liked that the product said you could use water to take some off in order to achieve the look you want. I ended up purchasing Romabio Paints Classico Limewash in the color Riposo Beige. I went with an off white/tan color because I didn’t want it to be too stark white and stand out too much. I was hoping the beige color would give it a more natural look.
Before fully taking the plunge, I tested the limewash on a few sample bricks that we had lying around (likely from our brick patio install) to make sure I liked the color. That’s one downside of tackling a project like this. It’s not like painting a wall where if you decide you don’t like the color, you can just paint over it. This is a bit more permanent so I wanted to make sure I was making the right decision before I dove all the way in. After painting the sample brick and examining this picture for far too long (haha), I decided I liked it enough to give it a try. Honestly, I hated the way the original brick looked enough that I felt like I couldn’t dislike it much more so I didn’t have a lot to lose.
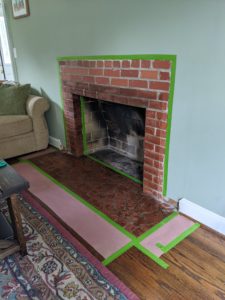
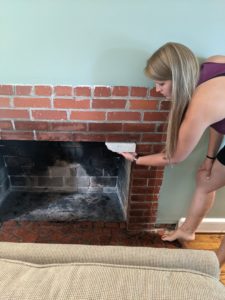
After thoroughly cleaning the fireplace with white vinegar and TSP, I put some paper down on the hardwoods to protect the floor and taped off along the wall to try to minimize the mess. The prep was actually pretty minimal and easy so I was thankful for that. Then, after dragging my feet for a bit longer, I finally decided it was time to get to work. Can you tell I was a little nervous? Haha. That’s typically how I handle projects I’m scared to tackle. I put them off for as long as I can until I finally realize I’m being ridiculous and then I get to it.
The actual painting process was relatively easy and straightforward and I wondered why I put it off for so long! All I had to do was spray down the brick really well with water, paint the limewash on using a regular paintbrush, allow it to dry for a few minutes and then spray with water again and rub off as much or as little as I wanted to achieve the look I was going for. It was very forgiving too which made me so thankful! It was really hard to mess up if I’m being honest.

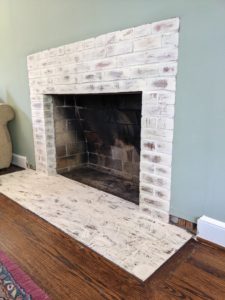
I’m really happy with how this turned out and glad that I decided to take the leap and try something new. Let me know what you think! Would you ever limewash your fireplace or your home? I know it’s a bit controversial, but like I said at the beginning, I think if it’s done right, it can be really beautiful! Be sure to tag me on Instagram (@joynerathome) if you try it. I’d love to see your projects!