Super Easy DIY House Number Sign
We’ve lived in our house for close to 5 years now and we’ve never had our house number actually on the house. Our mailbox has the address, but I feel like it’s a little hard to see and I’ve always wanted numbers on the house too just to make it easier for friends and family to find us when they come to visit. A few months ago I decided to challenge myself to make a sign with just things I already had on hand, except for the actual numbers of course. Here’s how it went!
I thought I had pics of the process but it seems I really only took video so sorry about that! I’m still going to upload the video and also do my best to explain thoroughly so you can replicate it if you want! (Heads up: the videos have music so mute your sound if you’re somewhere you don’t want other people to hear!)
I started by figuring out how big I wanted the sign to be based on how big the numbers were and spacing them out so that it looked good. Then I cut 1x2s to size and mitered the corners on a 45 to make a picture frame of sorts.
Once I got frame pieces cut to size, I sanded all of them down and then primed. I found an inspiration picture on Google of what I liked so I essentially copied that.

This is the inspiration picture.
(https://www.pinterest.com/pin/844847211321112044/)
I originally painted the trim pieces a mixture of Sherwin Williams Peppercorn and Tricorn Black, but I quickly realized it was reading way too blue so I nixed that idea and just used Tricorn Black. Then I finally got to assembling!
I’m going to go ahead and admit that it took me entirely too long to realize that buying corner clamps would make my life a million times easier when trying to assemble the frame. I struggled for a solid 30 minutes when I first tried to assemble the frame before I finally caved and bought corner clamps. Highly recommend. I used wood glue to attach each piece to the next and then used my nail gun to hold them together while the glue dried. Wood glue is way stronger than any nail or screw. Always use it when you can! I let the frame dry overnight and then assembled the rest of the sign. I had leftover cedar shingles from another project so I cut a few into smaller strips to use as the background of the sign. I liked the contrast between the black trim and the cedar. I also used black numbers so I wanted a background that would make them pop.
Again, I used wood glue to attach the cedar to the frame and then nails to secure it while the glue dried.
And here is the finished product!

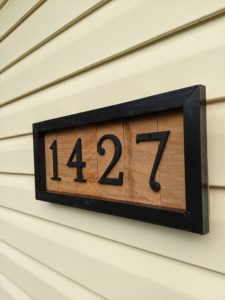
It is by no means perfect, but it works for what I was trying to accomplish and I’m happy with how it turned out. I really think anyone could tackle this project. Honestly, a miter saw, wood glue, and a hammer and small nails is all you really need (if you don’t have a nail gun). You could also find a way to make it work with a less expensive saw too if you don’t have a miter. A circular saw or a jigsaw could give you 45° cuts too, but would obviously be a bit more challenging. Or you could forego the miter all together and just do straight cuts and butt them up next to each other. Either way, your sign would look great, I’m sure! I liked the challenge of completing this project with only things I already had on hand and I think it turned out so nice! I’d love to see if you decide to tackle this project yourself. Tag me in your posts on Instagram or Facebook if you do (@joynerathome)!